Saturday, December 17, 2011

No Sew Ruffled Tree Skirt

I know you have probably seen the adorable ruffle tree skirt going around on Pinterest!?! It was love at first site when I saw the pin! I knew that my Christmas tree wouldn't be complete without one! :) So, I went out and bought everything I needed, invited a few friends over, and thought that I would have this baby done in 2 hours. Boy was I wrong! It took a long time. So keep in mind if you make this, you will need at least 4-5 hours.
You can click here to find the tutorial I used. I did everything that she did except use canvas for the base. I used a felt tree skirt that I found at Walmart for $5.I love the way this turned out! Worth every minute!


Thursday, December 15, 2011

Christmas Card Holder

This idea came from a few different pictures I found from google search. I love the way it turned out! I just took an old frame from D.I., primed and painted it. Once it was dry I used twine, and on the back of the frame I made the shape of a Christmas tree. You could also make them straight lines or diagonal. I have seen both ways done and they are both super cute. At first I tried using a glue gun, but it just didn't hold as tight as I wanted it to, so then I pulled out my staple gun. The staple gun worked great! Spray paint a couple clothes pins and add a bow and you've got yourself a dang cute card holder!


What do you think?

Monday, October 24, 2011

Christmas Wreath

I know it's not Christmas yet. In Relief Society I signed up to do a Christmas craft for the Super Saturday coming up, so I thought I would share with all of you. It needed to be something cheap and easy, which was exactly what this was! This cost me $4.00 to make. $2.00 for a yard of burlap and $2.00 for ribbon. Here's how I did it, in pictures :) It is too late to explain step by step! ... (P.S. I can't take credit for this idea. I have seen this type of wreath all over Pinterest and I just had to make one!)


I hot glued it in a couple spots around the wreath so the burlap would hold it's place.You can leave the bow hanging or tuck it in a little bit. Not sure yet which way I like better. Maybe I will just make another ;)

Friday, October 21, 2011

A Blues Clues Birthday!

Like always... long time, no post! Here are a few pics from my Son's Blues Clues Birthday Bash!


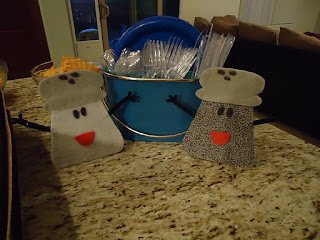
Let me just say, this banner made me wish I had a Cricut!This was my 3rd time using fondant. I definitely need some more practice, but this looks much better than the very first fondant cake I ever tried!Mmmm... Oreo pops. Have you tried them? The recipe is at the bottom of the post. I got it from one of my free Holiday Costco Cookbooks.Cake pops. Click here to find out how to make these. Cake pops are one of my husbands favorite things I make.Found these from Pinterest. The recipe is also on the box of cones that you buy.Got to have milk with all the sweets! I made these labels using photoshop on my computer. Super simple and cute!I also made the bubble and silly string labels using photoshop. I made the Handy Dandy Notebook with photoshop and some card stock. I took them to Office Depot and it took them 5 minutes to bind them. I only paid about $12.00 to bind 8.Mr. Salt and Mrs. Pepper I made with felt. I just cut out the shapes and used a hot glue gun to glue them together. Once I finished them, I glued them to card stock to make them stiff and able to stand. For Mrs. Pepper I used a Sharpe Marker and made dots on gray felt.I found a mailbox at DI for 50 cents. I wish I had a before picture because it was the ugliest thing I have ever seen! It was a dark green Hershey's mailbox. I painted it purple. Used felt for his face, his little flag, and the grass. Glued 3 wooden dowels together and spray painted them blue. I cut a round styrofoam ball in half and painted it green. I used hot glue to glue everything together and walla! I love the way he turned out!


This was such a fun birthday party to plan! The kids loved it! Happy Birthday Kaden!


Oreo Truffles:


1 pkg. cream cheese, softened
1 pkg. OREO Cookies, finely crushed (about 4-1/4 cups), divided
1 pkg. semi-sweet chocolate chips


MIX cream cheese and 3 cups cookie crumbs until well blended.
SHAPE into balls. Dip in melted chocolate; place on waxed paper-covered baking sheet. Sprinkle with remaining cookie crumbs.
REFRIGERATE 1 hour or until firm.

Tuesday, September 6, 2011

Lamp Redo


I have an old lamp that I have been wanting to give a makeover for quite some time. With the help of some pinterest ideas I finally did it!
I found the lamp shade at DI for $4.00. Covered it in some extra fabric I had, and hot glued some rolled fabric flowers onto the shade.


I taped the areas of the lamp that I didn't want painted. I cleaned the lamp, primed it with KILZ, painted it with Krylon Brushed Nickle, and walla, it was finished.


This lamp redo was quick and easy!


I love the way it turned out! What do you think?

Sunday, September 4, 2011

Lights!

When we bought our house, there was a fan over the dinning area. I like the fan, but not over the place where we eat, so we moved it to the living room (sorry no pics). Not having the extra hundred dollars to spend right now on a new light fixture for our dining area, I went to DI! I found a simple generic light fixture for only 5 bucks! It was missing a few pieces to have it hang from the ceiling so we went to Lowes and they had a little kit for hanging this kind of light fixture that cost only $3 and some change. After a little spray paint that I already had, this puppy was ready to hang! Thanks to Bri and Russ for doing all the hard work and hanging it for me. :) Only $9 for a light fixture over my kitchen table... awesome!!


Thursday, September 1, 2011

I'm back!

It has been a busy couple months! We are so excited to finally be settled into our new house! This was our 7th move since we have been married! We are so happy to be able to be in our very own house! No more moving for us! (at least for several years!)


A while back before we moved into the new house, I found this chest at a garage sale for $15! It has been on my to do list for a while and I finally get to cross it off! I have been looking for a toy chest forever! I was so excited when I found it! I can't stand toys all over my house! I try to keep all their toys upstairs in their rooms, but they seem to always trickle down to the family room. Now I have a place for toys in my family room! No more stuffing them in a corner!


(It never fails! I always start painting before I take a before picture!)


before


after


Wednesday, June 8, 2011

SALE SALE SALE


Things have been so busy with buying a house, packing the house, sick kids and sick husband! I haven't been able to work on my furniture pieces or this blog :( I can't wait for all this to be over so I can get back to doing what I love! In the meantime I still have some furniture pieces for sale. We don't want to bring them to the new house so I am lowering the prices!


Shelf- Was $60.00 now asking $45.00 You can find info on this shelf by clicking here.


Side/end table - Was $65.00 now asking $50.00 You can find info by clicking here.


High Chair- Was $75.00 now asking $65.00 You can find info by clicking here.- SOLD